Easy Italian Pinwheels

These easy Italian pinwheels are packed with amazing ingredients! They’re super flavorful and make a great party appetizer or quick lunch!
Try this appetizer alongside some other reader favorites: Meatloaf Meatballs, Best Ever Baked Parmesan Garlic Potato Wedges, or Copycat Bang Bang Shrimp.
Italian Pinwheels
Hey everyone! It’s Chelsea back from Chelsea’s Messy Apron with a delicious AND easy appetizer to share! As we’re approaching summer, this is a recipe you’ll want to have handy! It’s great to bring to a party or potluck — everyone will be begging for the recipe!
It also makes an easy lunch. You can even meal prep these Italian pinwheels; more on that later!

How to make Italian Pinwheels:
- Prepare ingredients: dry and then coarsely chop the roasted red peppers and pepperoncini
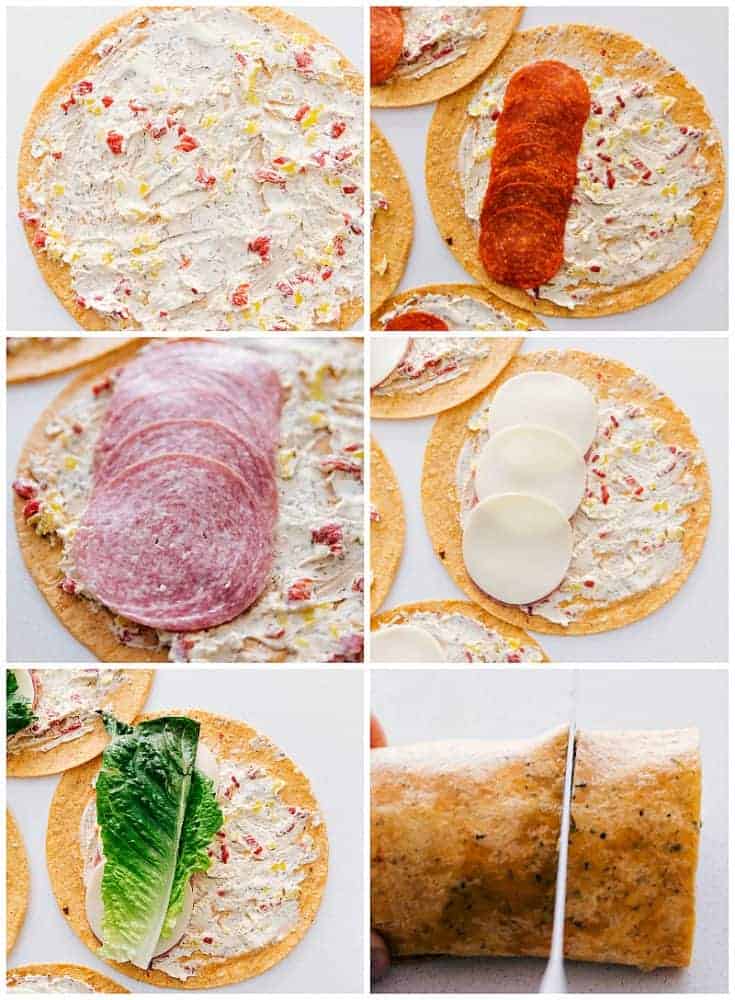
- Make cream cheese mixture: combine the cream cheese and Italian seasoning in a bowl and beat until smooth and creamy. Stir in the chopped peppers and pepperoncini until smooth. Smooth about 3 tablespoons of this mixture all over each tortilla.
- Layer on ingredients: now layer ingredients evenly across the tortilla in a horizontal line in this order: pepperoni, ham, salami, cheese, lettuce, tomatoes
- Roll up: roll the pinwheel into a tight cylinder, starting at the end with the filling. Wrap tightly with plastic wrap and place in the fridge to firm up for one hour.
- Eat: Use a very sharp knife to slice the pinwheels into 1 inch slices. Enjoy!!
How to meal prep with these Italian pinwheels:
- Start by making the pinwheels. Since they need to chill in the fridge for a bit it’s best to do those first. Once the pinwheels are chilled, cut them into 1 inch slices and then place 3-4 pinwheels into a plastic bag and then into the meal prepping container. This makes sure the tortilla part doesn’t harden at all and also doesn’t get soggy from the veggies.
- Add fresh veggies: start by washing and drying the veggies. Slice them into dip-able sizes and then put into the lunchbox/meal prep container. 2-3 different veggies are best for a good lunch variety. Add a small container of dip to go alongside the veggies! We like a ranch dip!
- Cover everything making sure it’s sealed in an airtight container and store in the fridge until ready to enjoy.
- And in case the pinwheels/veggies won’t quite fill you up, add a separate snack in a snack sized plastic bag. Some ideas: fresh berries/fruit, crackers, assorted nuts, chips, additional pinwheels, etc.
Variations for this recipe:
- Meat Lovers: leave out the veggies!
- Vegetarian: double the veggies and cheese, leave out the meat!
- Don’t want it spicy? Use just ham and pepperoni instead of salami and leave out the pepperoncini
- Want to add a little spice? Add 1/2 teaspoon red pepper flakes to the cream cheese mixture!
- Use different tortillas: we love sun-dried, but you can try an herb filled tortilla instead!

More easy appetizers for you to enjoy:
Easy Italian Pinwheels

These easy Italian pinwheels are packed with amazing ingredients! They’re super flavorful and make a great party appetizer or quick lunch!
- 5 large (10 inch sun-dried tomato tortillas)
- 1 package (8 ounces full fat cream cheese)
- 1 tablespoon Italian seasoning
- 2 roasted red bell peppers
- 1/2 cup pepperoncini
- 20 slices pepperoni
- 15 slices deli ham
- 15 slices thinly sliced salami
- 12 slices provolone cheese
- 5 large pieces romaine lettuce
- 2 large roma tomatoes (thinly sliced)
- Thoroughly dry and then coarsely chop the roasted red peppers and pepperoncini
- Combine the cream cheese and Italian seasoning in a bowl and beat until smooth and creamy. Stir in the chopped peppers and pepperoncini until smooth.
- Smooth about 3 tablespoons of this mixture all over each tortilla.
- Now layer ingredients evenly across the tortilla in a horizontal line in this order: pepperoni, ham, salami, cheese, lettuce, tomatoes
- Roll the pinwheel into a tight cylinder, starting at the end with the filling. Wrap tightly with plastic wrap and place in the fridge to firm up for one hour.
- Use a very sharp knife to slice the pinwheels into 1 inch slices.
- Enjoy after being cut or read blog post for instructions on meal prepping!
from The Recipe Critic http://bit.ly/2UJeViw


Kommentarer
Skicka en kommentar